Sometime we talk about that since Geographics you can export / import data with ESRI, creating shp files. But if you have installed ArcGIS, the interoperability extension has very good features, let’s take a look:
1. Activate the extension.
This can be done with tools > extensions and here we activate Data Interoperability extension.
The tool is in ArcCatalog, but in case the extension is not active or you don’t have license, the system will advise you (I’m using ArcGIS 9.3)
2. Import data
After you run the Quick Import, it displays a panel that asks basically two topics: what are we going to import and where are we going to store. In this case, I want to import data from project Geographics, stored in an Access database, with attributes that were created in a dgn file and that I want to stay within a  geodatabase.
Input DataSet. We must recognize the merit that with this extension ArcGIS can read and process CAD/GIS data from more than 115 formats supported by FME of Safe software. Between them, AutoDesk, CityGML, GeoJSON, GeoRSS, Google Earth, IDRISI, GeoMedia, LandXML, MapInfo, PostGIS, PostgreSQL, Trimble JobXML, TIGER, WFS, etc.
In the Bentley’s case, there is option to import simple vector and also from a Geographics project (it still doesn’t do with xfm Bentley Map data). Be careful that the dgn files can be called with many extensions as .cat, .hid, .adm, .cad, etc. To do this, you must enable the option in tools > options > CAD, if you don’t, it could only recognize dgn files extension.

Source. Here it identifies the source of spatial data, in this case we chose Bentley MicroStation GeoGraphics as format. Then in Dataset choose the file that contains the spatial relationship, we must bear in mind that the file extension must be the same which is indicated in the Geographics project, and  registered because the association of mslink is based on it.
It must be set the coordinate system that has the map, in this case, Projections, UTM, WGS84 Datum and zone 16N.
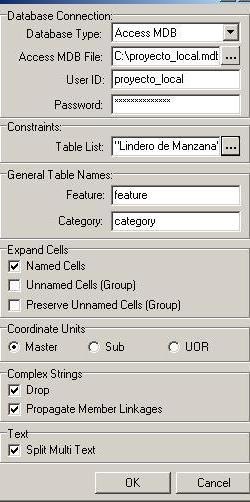
It must be configured the connection parameters on the Settings button. In this case:
- ODBC connection type, from the database called Proyecto_local.mdb
- Enter the username and password defined in the project
- Then select the attributes that we hope will be imported. For purposes of example I want the block boundaries, which means that it would bring from that map, the vectors that are assigned to this attribute.
- Additionally, we can establish if the cells (blocks) are maintained as grouped objects. Also we establish if the units will form the primary or secondary (master or sub).
- You set up, hopefully with Complex Strings, those objects that contain curves, grouped lines and multiple shapes. These can ungroup (drop) or spread links to tie each object to a single field in the table (many-to-one).
- Finally, if we expect multi-line texts to separate
- Output Staging Geodatabase
- Unless you set something different, ArcGIS creates a geodatabase with dgn file name, where you enter all data
- The console starts the process and alerts you if something could not be achieved, and upon reaching the records indicates how many are admitted to the database. Also in that directory create a file containing a log of what happened during the import

3. The results
There you have it, the edges of the block as featureclass in the database, the same way you can import different attributes that, in case you have tables associated within the mdb, will come as attributes of the shape.
 Autocad Software, Bentley Microstation, Gis Google Earth, Gis System Geomate Provides Services For Complete Gis Software And Solutions, Autocad Software, Autocad Courses, Bentley Microstation, Microstation Software, Gis Google Earth, Open Source Gis And More.