In an earlier post, I’ve spoken about Bentley Cadastre’s logic and origin, which itself is a Bentley map oriented application for plot management that takes advantage of xfm infrastructure and topological control.
In my opinion, Bentley’s Cadastre implementation occupies an alien smoke (a Spanish idiom: “fumada extraterrestre”) in case of walking from scratch; it may be easier for those already familiar with Bentley Map, or had at least used Microstation Geographics. As I said before, it has much to give (more than you might expect) but when a common user faces it, a first basic question like this appears:
How rays do I implement this?
As by users’ order, Bentley implemented what is called Schema Wizard, a step-by-step guide for topological features’ creation whose customizations will be stored in an xml called schema file. This is what would be done from the Geospatial Administrator, a tool which I have spoken earlier. Somehow it can be considered that this wizard is an improvement in user’s approach; this application can be customized further more.
The logic is the same as AutoCAD’s Civil 3D routine for plots, a tool which I spoke of when we showed the creation of the bearings and distances box, but it’s not as simple. Let’s see then how Schema Wizard works
How to activate it
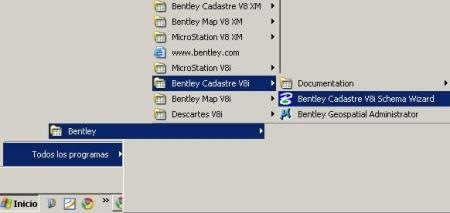
To start it, you should go to “Start / all programs / Bentley / Bentley Cadastre / Bentley Cadastre Schema Wizard”
Then, it should appear the welcome panel that gives us the option to continue, cancel or consult Help.
In the next step, it asks about the “seed file” to work with. Bentley calls “seed file” the file-specific features ranging from the units of measure, angles, format levels (layers) formation to projection and if the file will be in 2D or 3D. By default, Bentley brings some seed files ready to use in “Program files / Bentley / workspace / system / seed”.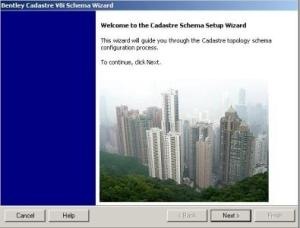
Now, in this case, the seed file that is asking for is an xml, or a seed file for xfm.
For this task there are also some feed files in “C:Documents and Settings All Users Program Data Bentley WorkSpace Projects Examples Geospatial BentleyCadastre defaults seed schemas” and come as examples:
- EuroSchema.xml
- DefaultSchema.xml
- NASchema.xml
In this case I will use the Default.
 What to customize
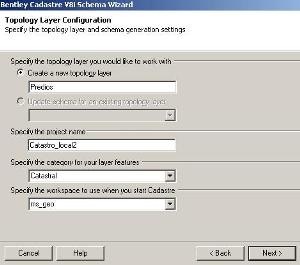
From there, appears the topological layer configuration panel that will store the plots where we must define:
- Topological layer’s name. By default is “land”, but in this case I’ll name it “Predios” (properties)
- It also asks the project’s name, I will name it “Catastro_local2” (Local_Cadastre2)
- Then it asks the category name, so I’ll name it “Catastral” (Cadastre)
- And finally it asks for the workspace name, I’ll name it “ms_geo“
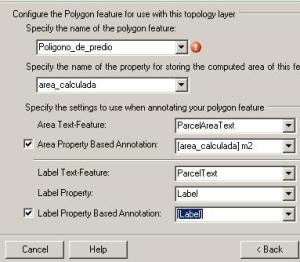 In the next pane we define the items characteristics for closed figure’s type (polygons):
- Name of the feature class, I’ll call it “Poligono_de_predio” (Property’s polygon) this does not accept special characters.
- Name of calculated area, I’ll call it “area_calculada” (calculated area).
- Units of measure, I will use square meters, and I will call it “m2“
- Then it lets you add other settings for the plots’ labels.
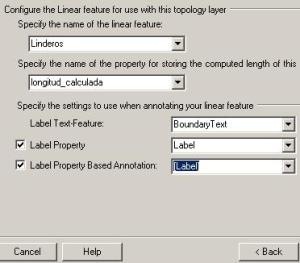
Bentley always keeps the smoke for well handling shapes, as in the previous panel, or “boundary – node” which is the idea of a centroid within a topologically closed area but that may be linear objects without forming a shape. Clearly, both layers can not live together in the same topology, so the next panel is to configure the linear topology (Lines):
- I will call “Linderos” (boundaries) to the plots’ linestrings.
- Then I’ll name “longitud_calculada” (calculated length) to the calculated distance from the boundaries.
- Then it asks me see if I want these labels be shown in the linear geometries
The next panel is for establishing the topological properties of node type objects (Points); it can coexist in the same layer with a boundaries topology and also a shapes’ one.
- Same as previous, it requests the option for labeling and the name of the field in the xml structure
Finally displays a results pane of the done settings, to keep the schema file. Remember that for now we have made a property layer but could be added others with the additional layer button such as property layer, urban perimeters, neighborhood, colony, area, region, sector, map etc.
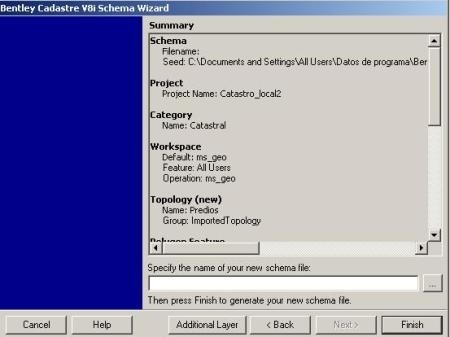
I will call “Catastro_local2” (local cadastre2) to the schema and pressed the “Finish” button; then a black screen appears that is storing everything and its all finished.
How to use
If we look at this, now it had been created a link to the configured project as it is shown in the chart. This is what before was done manually with the creation of the “ucf” file and that is being stored in the users folder within the workspace, as shown in the second chart,
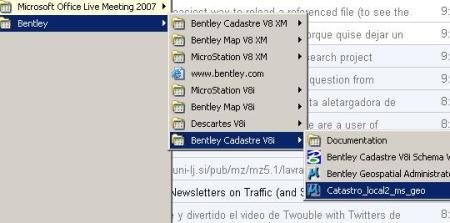

Indeed, when we enter, the project is already opened in the created folder, even brings a sample file. Look that at the time it is already defined the user and interface in case you have defined them.

And there you have it; the minimum topologies created, in the right pane there are Bentley Cadastre tools and we are ready to work. It also displays a panel to connect to a database the first time.

It is clear that this is simply the basic creation of the schema file to work with a cadastral project; it is obvious that the Geospatial Administrator can do this with a little more pain and customize it to the sublime. We will already see it another day.
Conclusion
In short, a significant improvement in the approach to the Microstation Geographics or Bentley Map user, at least for the creation of an xfm topological structure without starting from scratch with the Geospatial Administrator, and the creation of the ucf file once.
Even so the user’s question remains: well, and now we must only draw lots? Because in this task, it fall short how manuals are done, all geared to windows and not just to processes.
It’s left for learning all what is done from user’s side regarding on topological standards and other Bentley Map basic functionalities like spatial analysis or theming.
 Autocad Software, Bentley Microstation, Gis Google Earth, Gis System Geomate Provides Services For Complete Gis Software And Solutions, Autocad Software, Autocad Courses, Bentley Microstation, Microstation Software, Gis Google Earth, Open Source Gis And More.